
Build a seating chart from an image
Upload your venue's existing seating chart and trace over it to build a reserved-seating chart in Stageworks.
Here's how to build a reserved-seating chart for your venue. Instead of starting from a blank canvas, you'll upload the seating chart your venue already has and trace over it: a block of seats for each section, shaped to match the image, then fine-tuned row by row. Let's get started!
Before You Start
Have an image of your venue's seating chart ready, such as a JPEG or PNG. If yours is a PDF, take a screenshot of it and use that.
Use a computer with a full-size browser window. On smaller screens, charts open view-only.
For this example we're going to build the following seating chart:
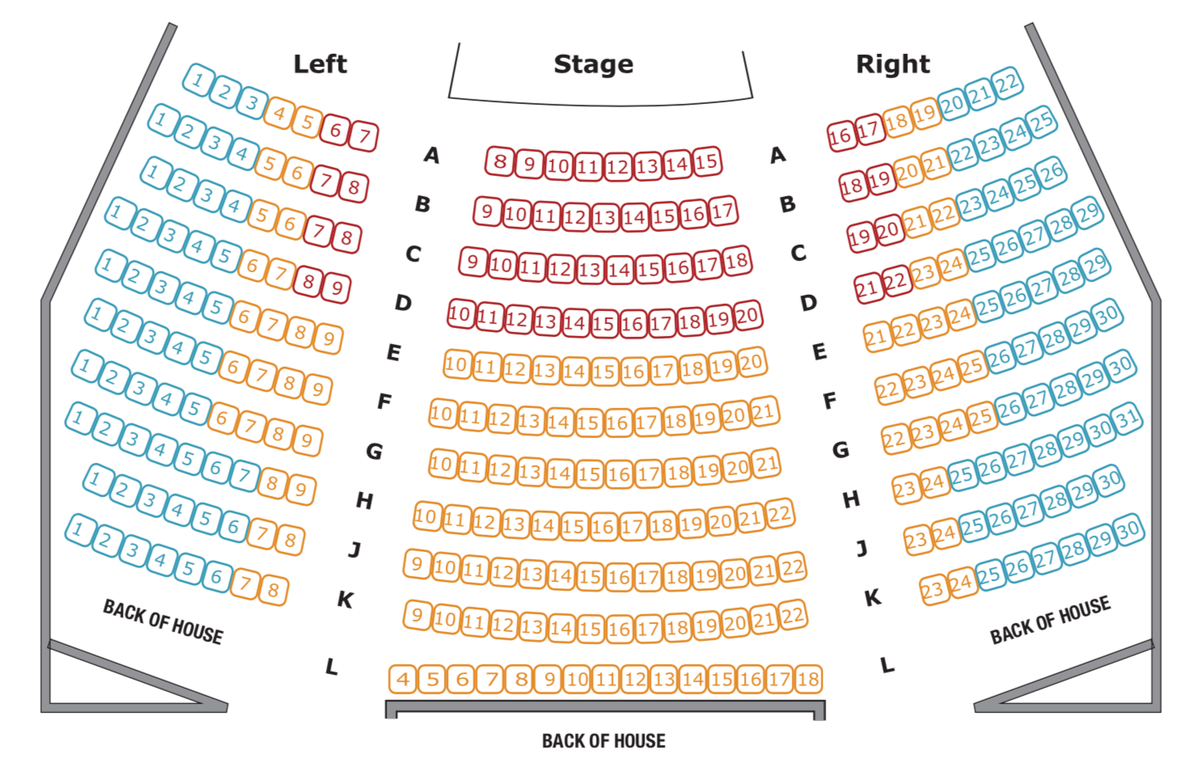
Click here to save this image to follow along.
Create the chart
- Step 1:
Click Ticketing, then Seating Charts.
- Step 2:
Click Create chart.

- Step 3:
Enter a Chart name, like the name of your venue or room, and click Create.
The editor opens with a stage outline and no seats. The tools sit at the top right of the canvas, and whatever you select shows its settings in the panel on the right.
Your changes to the chart aren't saved until you click Save, so save as you go.
Upload your venue's map
The image is only a guide to trace over. It stays in the editor: patrons never see it.
- Step 1:
Click the Settings tool.
- Step 2:
Under Reference image, click Choose file or drag here and choose your image.

- Step 3:
Drag Scale to size the image. You'll fine-tune it once your first section is in place.
- Step 4:
Lower Opacity until the image is faint enough for your seats to stand out against it.
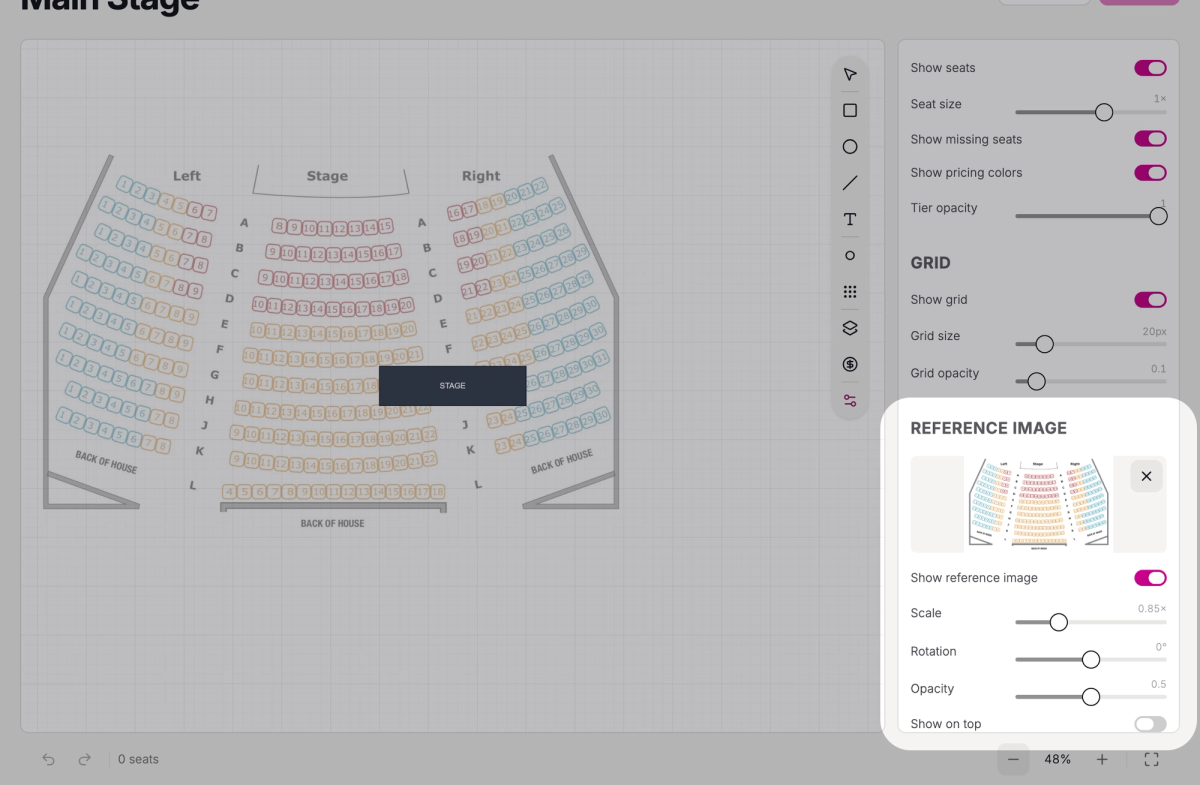
The image stays centered on the canvas and can't be dragged, so you'll move your seats onto it rather than the other way round. If it runs off the screen, scroll on the canvas to zoom out.
Place the stage
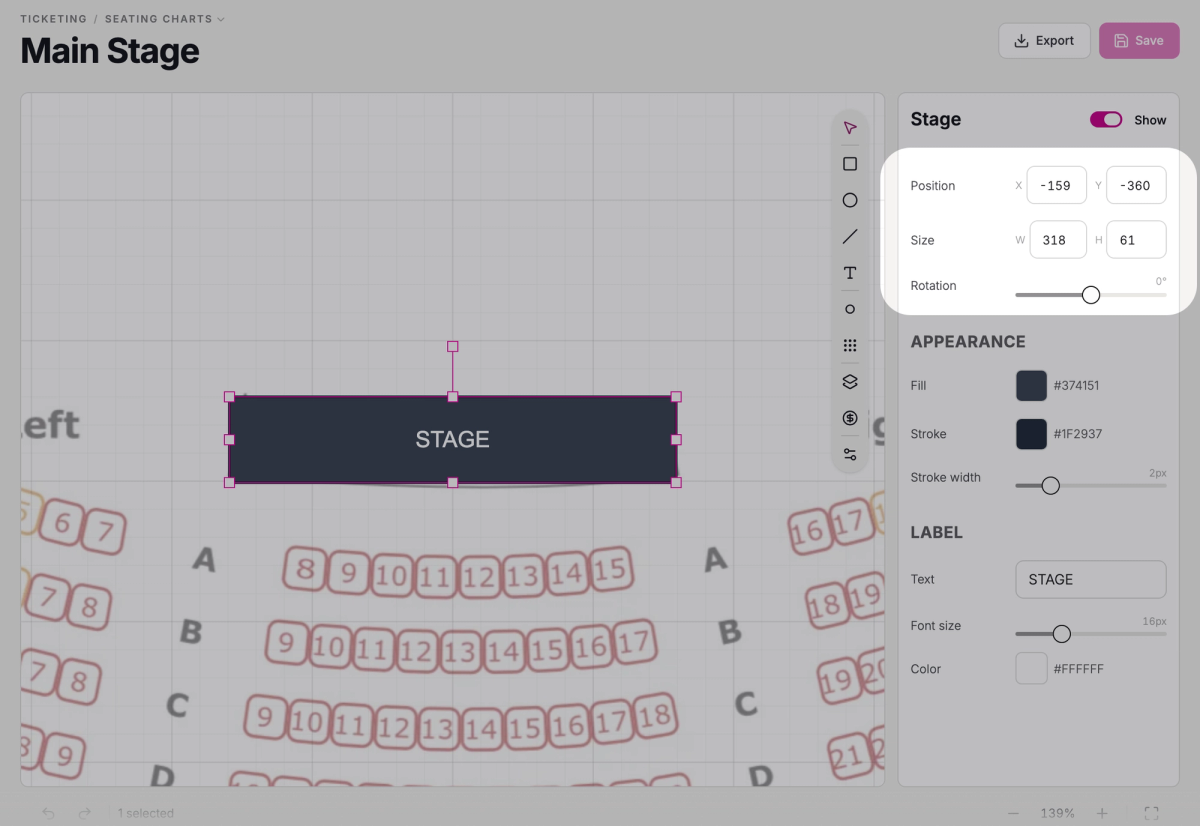
Every new chart comes with a stage, and patrons see it when they pick seats, so line it up with the stage on your image.
- Step 1:
Click the stage on the canvas.
- Step 2:
Drag it over the image's stage, and drag its handles to resize it. You can also type its Position and Size in the panel.
Add a seating bank for each section
A seating bank is a block of rows that share the same spacing, like one section of your house. Start with the section whose rows are most regular. In the example, that's the left section.
- Step 1:
Click the Seating bank tool, then click an empty spot on the canvas. A bank of 3 rows of 10 seats appears.
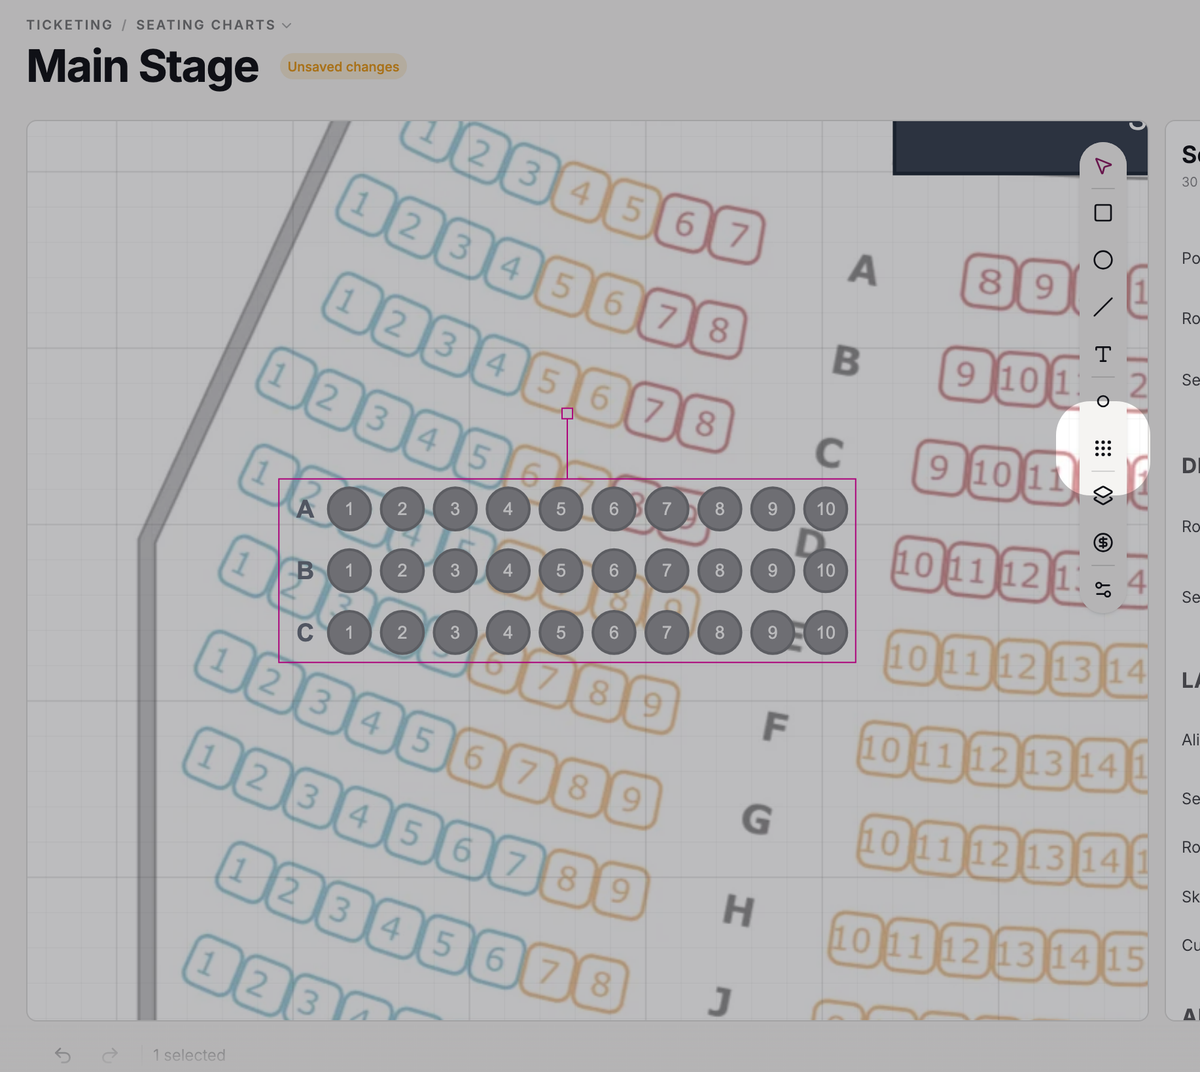
- Step 2:
Drag the bank onto its section of the image. You can grab it by any seat.
- Step 3:
Set Rows to the section's number of rows, and Seats/Row to its most common row length. You'll fix the longer and shorter rows later.
- Step 4:
Drag Rotation until the bank's rows run the same way as the image's. In the example, both side sections are angled toward the stage.
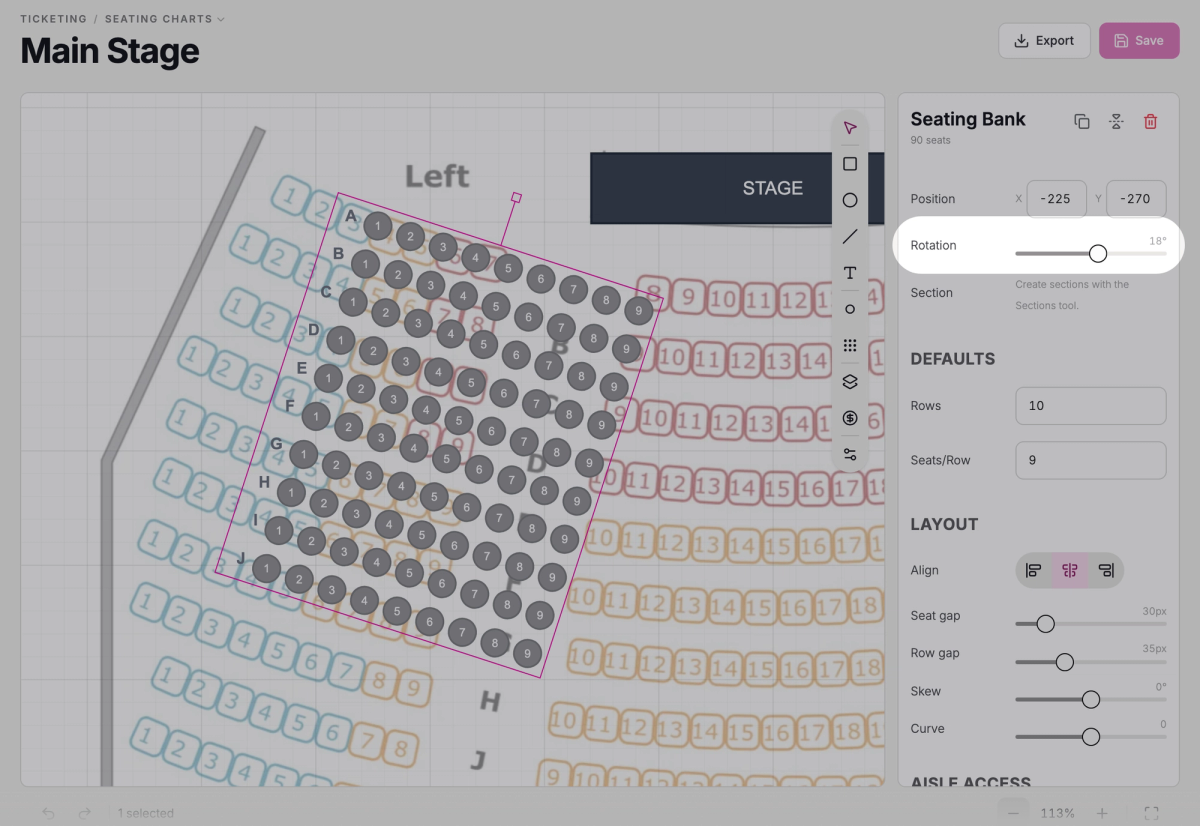
- Step 5:
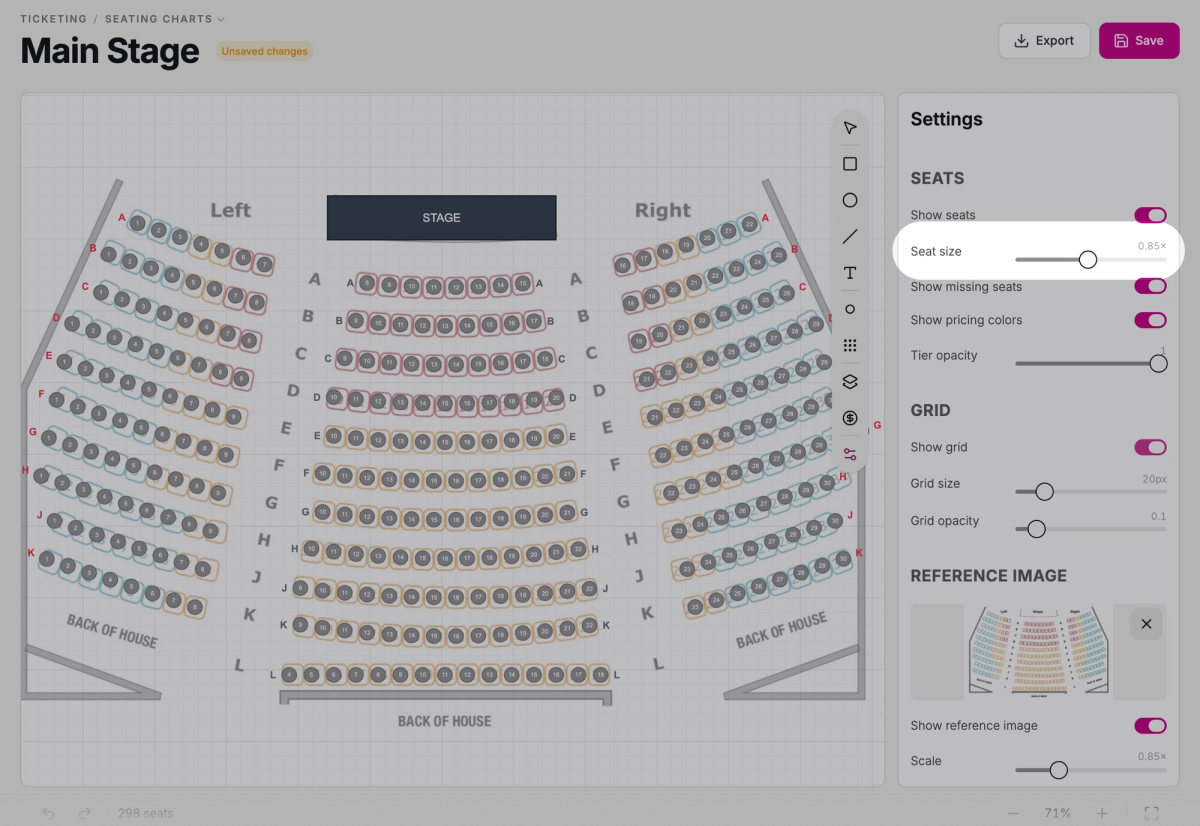
If the image's seats are much bigger or smaller than yours, click Settings and adjust Scale, then click the bank again. Then drag Seat gap and Row gap until each seat sits on a seat in the image.
- Step 6:
Under Align, choose which end of the rows lines up once some rows are shorter. In the example's left section, the rows line up along the center aisle, so it's aligned right.
- Step 7:
If one side of the section ends at a wall or railing, turn off that side under Aisle Access, so those seats aren't offered as aisle seats. In the example, the left section's Left side is a wall.
Shape it with Skew and Curve
Few sections are a neat rectangle. Two settings under Layout reshape the whole bank at once.
Skew slants the bank, for angled sections like the example's sides: each row shifts a little further sideways than the one in front of it.
Curve bends every row into an arc, for rows that wrap around the stage, like the example's center.
- Step 1:
With the bank selected, drag Skew until the ends of its rows follow the image.
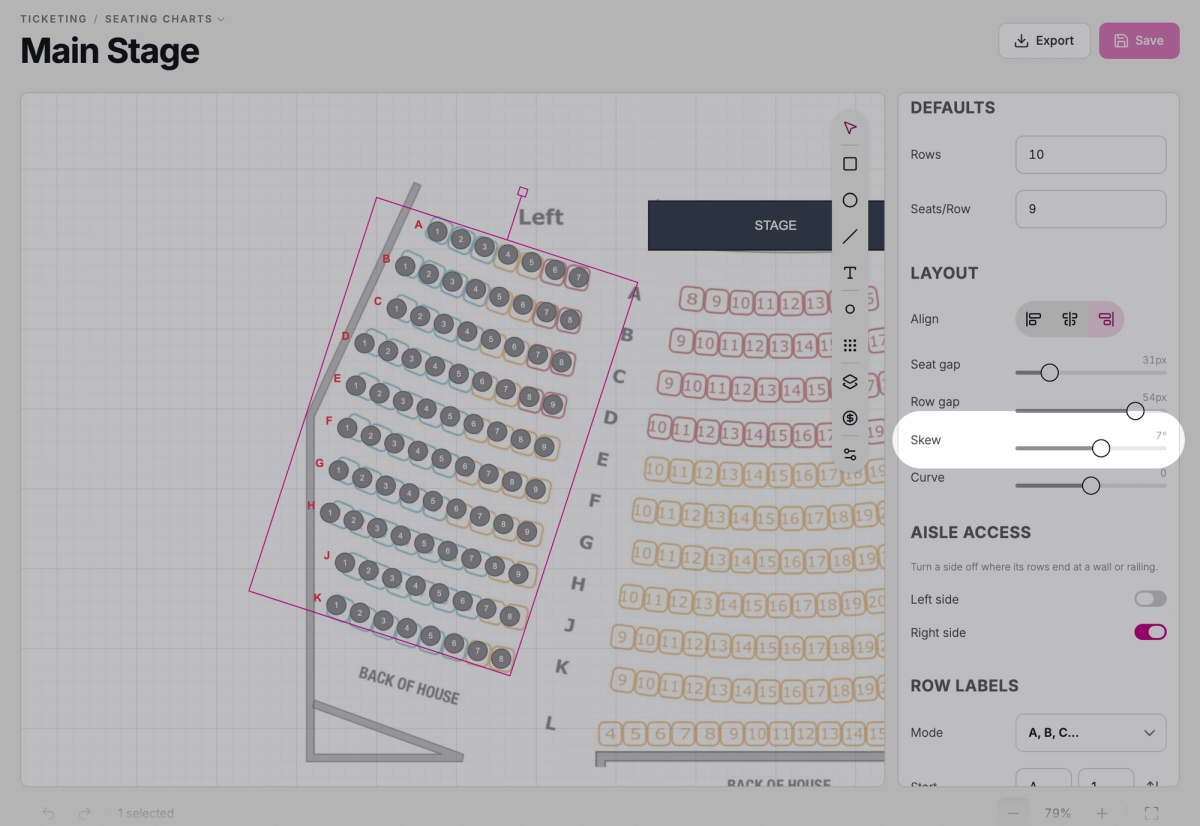
- Step 2:
Drag Curve until the rows' arc matches the image.
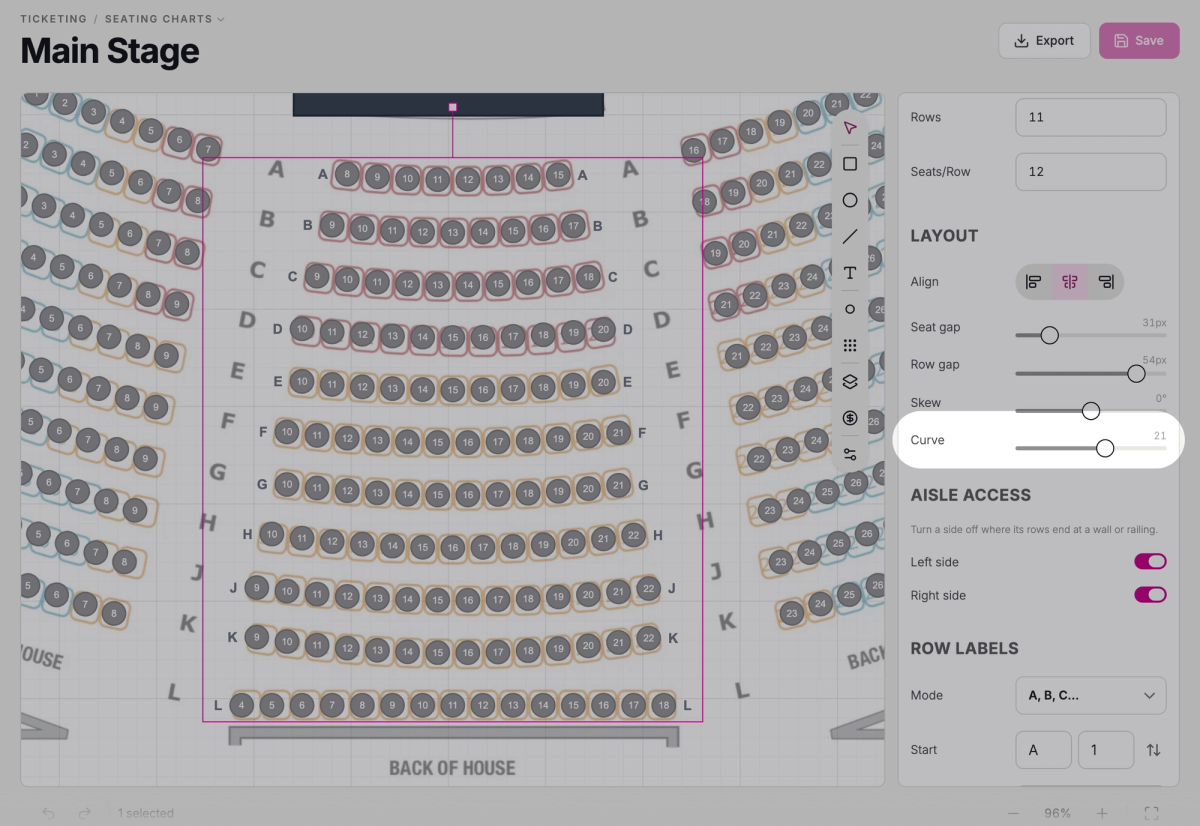
Get the whole bank as close as you can before you fix single rows: the better it fits, the fewer rows you'll need to fix.
Number the rows and seats
Patrons pick seats by row and number, so give every seat the row and number printed on your tickets, with no two seats the same.
- Step 1:
Under Row Labels, choose a Mode, letters or numbers, and set Start to the front row's label.
- Step 2:
If your venue skips a letter, type it in Exclude. The example has no row I, so it excludes I.

- Step 3:
Under Seat Labels, set Start to the number of the seat at the left end of each row, as the chart appears on screen.
- Step 4:
Under Show, choose whether row labels appear at the Left end of the rows, the Right, or both.
Rows count from front to back and seats from left to right. If your venue numbers seats the other way, click the two-arrow button at the end of the Start line. For odd or even numbers on each side, type 2 in the box just before it.
Copy a section to the other side
If your house is symmetrical, finish one side and copy it.
- Step 1:
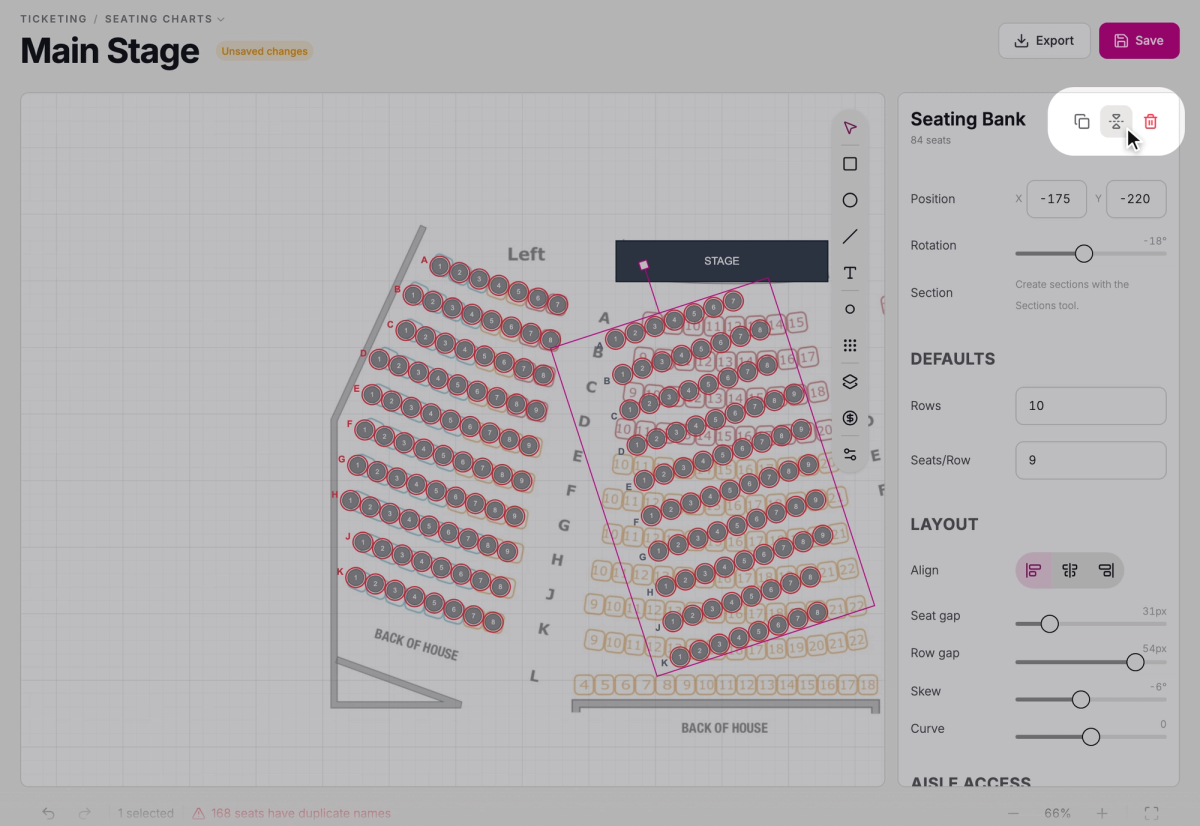
With the finished bank selected, click Duplicate at the top of the panel. A copy appears, offset slightly from the original.
- Step 2:
Click Mirror to flip the copy: its Rotation, Skew, Align, and Aisle Access switch to the other side.
- Step 3:
Drag the copy onto the other side of the image.
- Step 4:
Set the copy's Seat Labels Start to match your tickets. The copy keeps the original's numbering until you do.
- Step 5:
Mirror doesn't move the row labels, so under Show, choose the end you want them on.
A section that isn't a mirror image, like the example's center, gets its own bank: add it the same way.
Fit each row with row overrides
Real rows are rarely identical. Front rows are often shorter, back rows straighter, and some rows start at a different seat number. Row overrides change one row without touching the rest of the bank.
- Step 1:
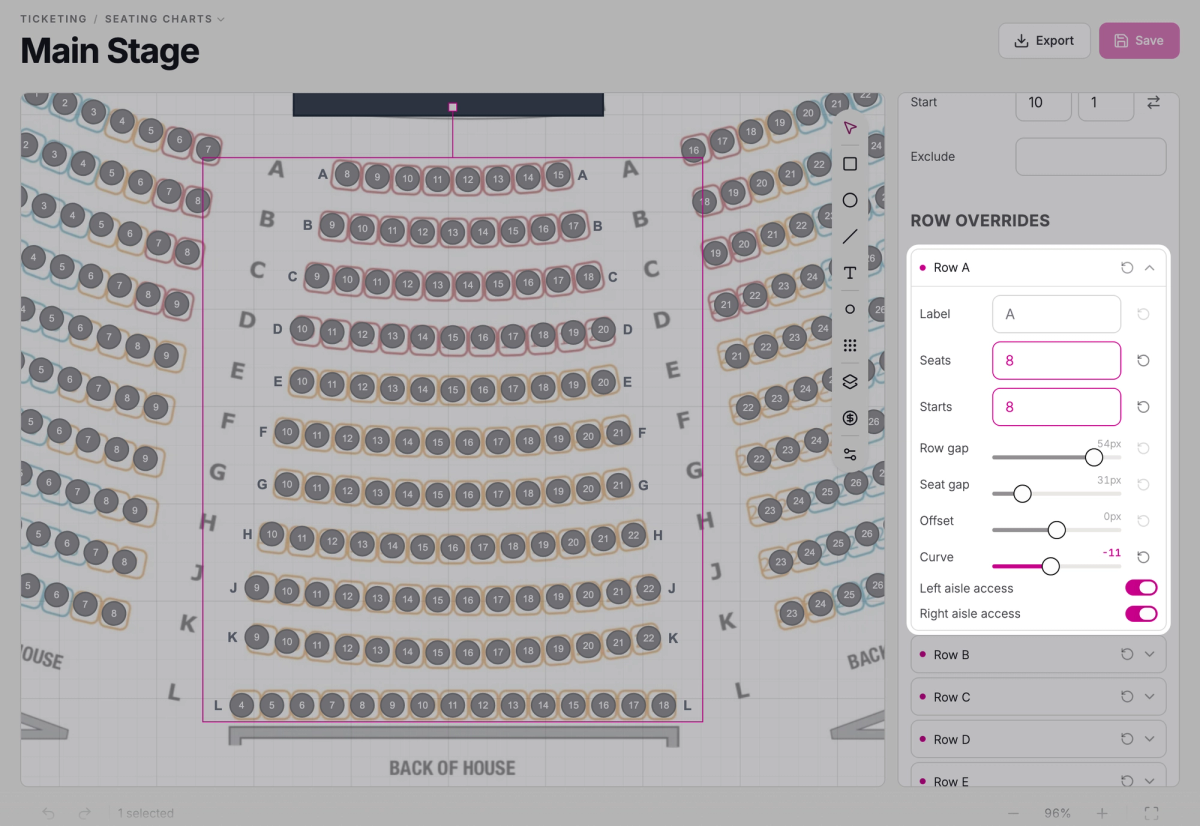
Click a row's label on the canvas. Its settings open in the panel under Row overrides.
- Step 2:
Change only what's different about that row.
Seats sets how many seats the row has, and Starts sets its first seat number. Curve bends just this row: drag it until the row lines up with the image. Offset slides the row sideways. Row gap sets the space between this row and the one behind it.
In the example, the center's front row has 8 seats starting at seat 8, so change its Seats and Starts. The back row is straight, so drag its Curve until the row lies flat.
A dot beside a row's name shows it has overrides, and any setting you leave blank keeps the bank's value. To start a row over, click the reset arrow beside the row's name.
Save your chart
- Step 1:
Click an empty spot on the canvas (or press Esc) so nothing is selected.
- Step 2:
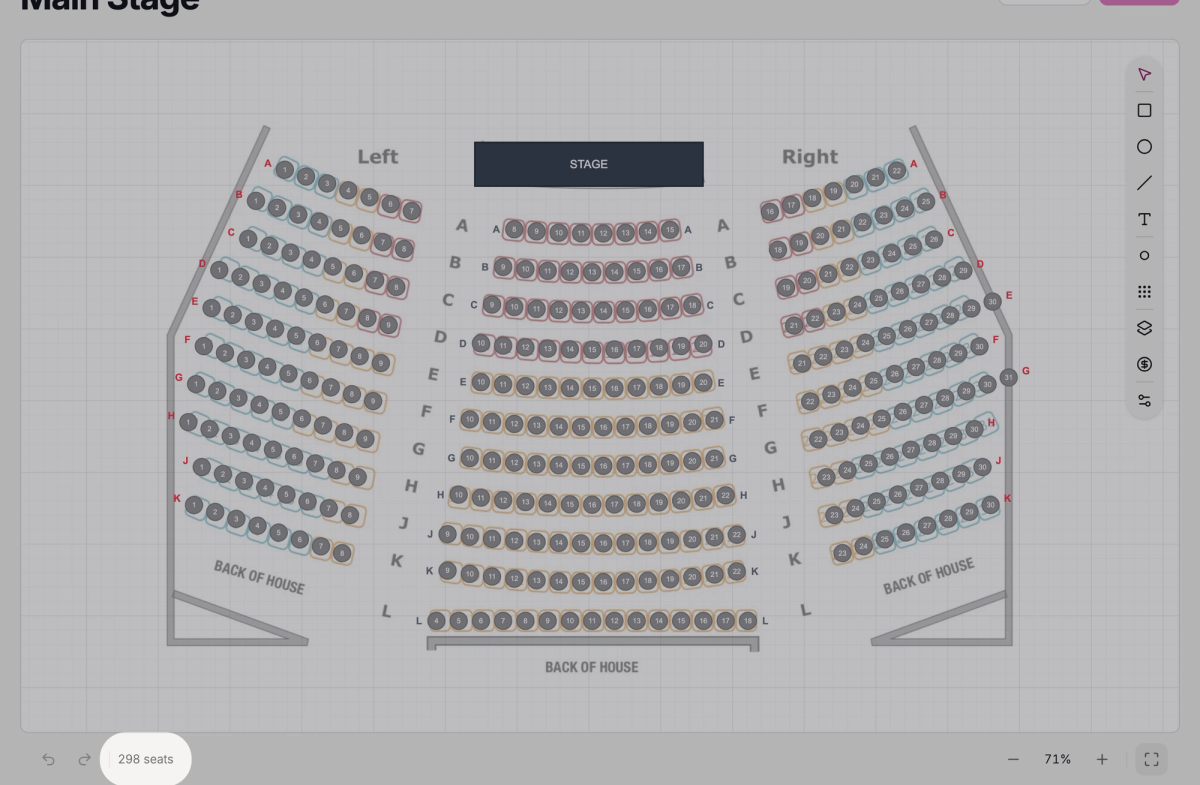
Check the status bar under the canvas. Its seat count should match your venue's capacity, with no duplicate names warning beside it.
- Step 3:
Click Save, or press Cmd/Ctrl+S.
You'll see "Seating chart saved". Next, choose this chart for your event's dates.
Troubleshooting
"Seating chart not saved"
Your change would remove seats that have tickets sold for an upcoming event, and renumbering a seat counts as removing it. The message lists the seats and events. Restore those seats or their numbers, or wait until the events have passed, then save again.
"2 seats have duplicate names"
Two or more seats have the same row and number, usually because a copied bank still has the original's numbering. Change the bank's Seat Labels Start, or a row's Starts, until every seat matches your tickets, then save.
Was this article helpful?